
gRPC witrh Rust the fastest?Pursuing 1ms
Menu The time between request and response should be as short as possible. It is also desirable in terms of user experience, and nowadays …
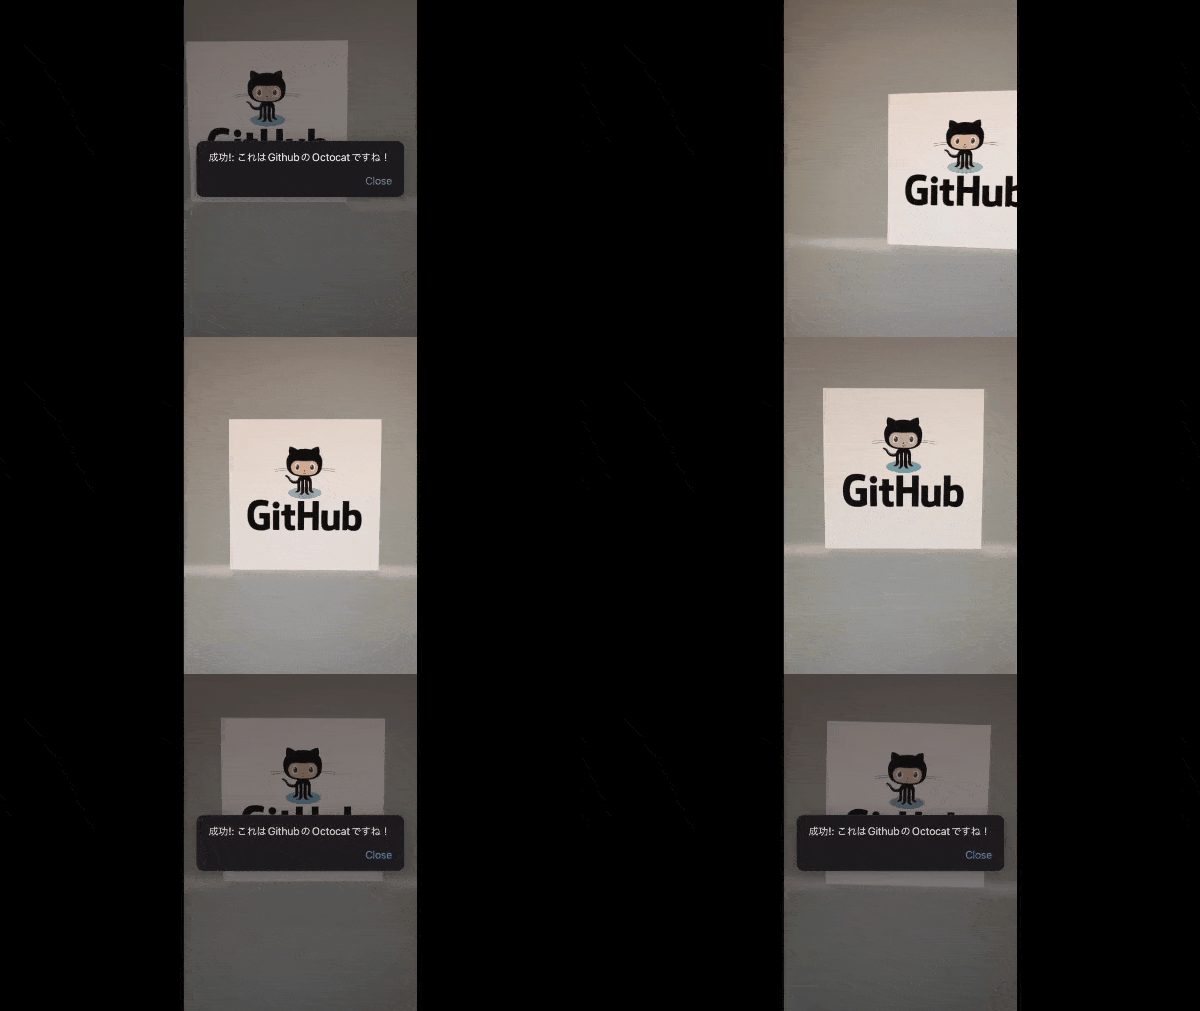
You can start the camera on your browser and manipulate the images you see. I’ve created a system that allows you to see which images match what you are viewing. I looked for a good library, but couldn’t find one, so I made one for myself and made it public. To be honest, it’s not very versatile, but you can use it as a reference. (Rust, Node required).
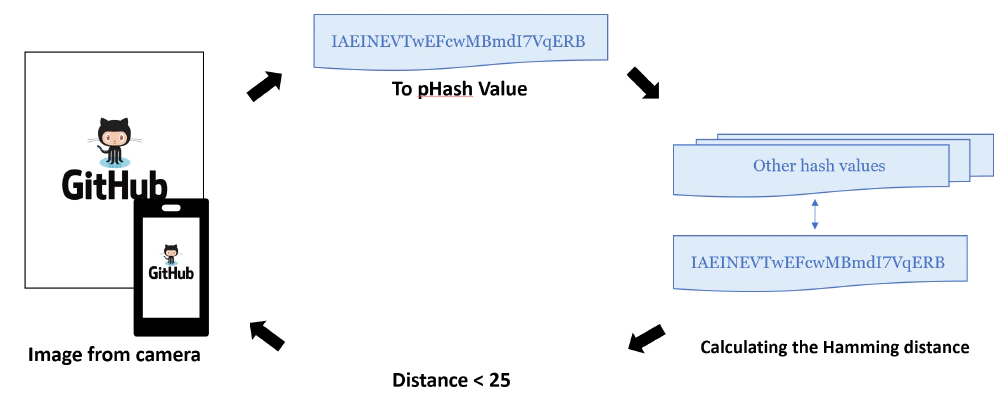
One of the easiest ways to determine if an image is approximate is to use the pHash method, which measures the distance between the hash values of an image. We will use this method, but even though it is easy, it seems to use a lot of machine power to calculate the hash value of the image pixels. Therefore, we will create a module for image hashing in Rust, which seems to be more efficient, and load it from Js as Wasm.

I also set hash_size to 12 by default because the most accurate hash value for an image of 500px~1000px is about (12bit×12bit)
extern crate image;
extern crate img_hash;
use img_hash::{HasherConfig, ImageHash};

fn get_hash(target: &image::ImageBuffer<image::Rgba<u8>, std::vec::Vec<u8>>, hash_dim: u32) -> ImageHash {
    let hasher = HasherConfig::new().hash_size(hash_dim, hash_dim).to_hasher(); // hash_dim = 12
    hasher.hash_image(target)
}
However, the two images (1) and (2) below the similarity judgment in terms of the distance of the hash value showed almost no similarity.


If the location of the target changes significantly, the hash value will be completely different.
If you create multiple images in which the position of the correct image has been shifted and judge these images and the images loaded from the camera, you should be able to absorb some shake and misalignment. The following is an example of trimming to three rows and three columns.

If you prepare images that are trimmed in 5 rows by 5 columns, 4 rows by 4 columns, 3 rows by 3 columns, and 2 rows by 2 columns. The accuracy will be high enough if you prepare images trimmed in 5 rows and 5 columns, 4 rows and 4 columns, 3 rows and 3 columns, 2 rows and 2 columns. The following code is used to create the trimmed image. Please check the source code for details.
let axis = n * 2 + 1;
  for x_axis in 0..axis {
      for y_axis in 0..axis {
          let x = x_axis * sub;
          let y = y_axis * sub;
          let _image =
              image::imageops::crop(target, x, y, size - sub * n * 2, size - sub * n * 2)
                  .to_image();
          let resize_image = image::imageops::resize(
              &_image,
              size / 2,
              size / 2,
              image::imageops::FilterType::Nearest,
          );
      }
  }
If you use cropping of images with a maximum of 5 rows and 5 columns, that’s 75 images in a set. If we want to determine which of the 10 types of images held up by the camera is which, we need to hash the 750 images and calculate the distance between them.
| Number of images per set | |
|---|---|
| Up to 4 rows and 4 columns | 30(4^2 + 3^2 + 2^2 + 1) |
| Up to 5 rows and 5 columns | 75(5^2 + 4^2 + 3^2 + 2^2 + 1) |
No matter how fast Rust’s processing is, calculating the pHash for 750 images takes a lot of time, and loading 750 images in a browser is inefficient in itself.
Therefore, it is possible to calculate the hash values of all the identified images by breaking them down into 75 trimmed images and calculating the hash values of all of them in advance, and then calculating and comparing the hash values of the images taken from the camera in real time. The following command is used to output the hash values.(README)
./lib/target/release/hash ./png_images ./src/hash
As for the distance between the 12-bit and 12-bit hash values, it seems that the images are almost identical when the distance is less than 25. This parameter needs to be adjusted.
The rest of the process is to start the camera normally, extract the image at a certain point in time, hash it with WASM, and calculate the distance between the hash value and multiple hash values prepared in advance. If the distance between the hash values is less than 25, a match is made, and if not, the process is repeated by extracting the image displayed on the camera again.
Load and use it on a web page as shown below.
<meta name="viewport" content="width=device-width,initial-scale=1"><!--This setting is mandatory for smartphones. -->

<video id="video" autoplay playsinline></video>
<canvas id="frame" style="display: none;"></canvas>

<script type="text/javascript" src="./image-scanner.ja.js"></script>
<script type="text/javascript">
  imageScannerStart(
    200, // Camera scan frame width(px)
    200, // Camera scan frame height(px)
    100, // Camera scan frame y axis(px)
    document.getElementById("video"), // video element
    document.getElementById("frame") // canvas element
  ).then(res => {
    console.log('Success!: id=' + res)
  }).catch(err => {
    console.log(err)
  })
</script>
It might be easier to understand if you use CSS to create a frame for the scan.
What this system can be used for is to use the contents printed in publications that do not have QR codes printed on them in the same way as QR codes. Of course, it may not be possible to do exactly the same thing, but it is possible to lead to the Web and applications from books that cannot be printed with QR codes for various reasons or that have already been published.
In addition, when a QR code is printed on a printed matter, the code will continue to circulate in the world and access to the reading destination will continue. However, if such a mark, which is neither a code nor anything else, can be used like a QR code, it may be possible to reduce the risk in the future. In other words, it is possible to loosely connect publications and the digital world.

Menu The time between request and response should be as short as possible. It is also desirable in terms of user experience, and nowadays …

As of April 2022, almost all infrastructure and network engineers have probably never heard of NYM. On the other hand, some of you may have arrived at …